Anthos(GKE Enterprise):Cloud Service Meshを利用する
Cloud Service Meshを利用する手順を説明します。
- ステップ1:Cloud Service Meshを有効にしてクラスターを作成
- ステップ2:Namespaceの作成
- ステップ3:自動サイドカーインジェクションの有効化
- ステップ4:Deploymentの作成
- ステップ5:Serviceの作成
- ステップ6:Serviceにアクセス
ステップ1:Cloud Service Meshを有効にしてクラスターを作成
本手順では、管理クラスターでCloud Service Meshを利用する方法を説明します。ユーザークラスターでも同様の手順で利用できます。
コントロールパネルにログインし、Catalogのダッシュボードへ移動します。
リソースグループを作成します。
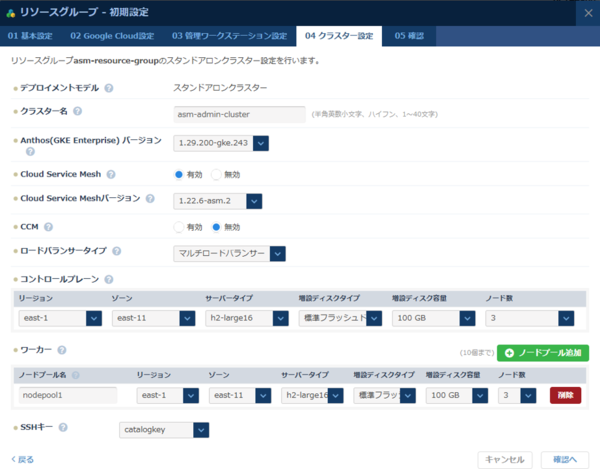
リソースグループの作成方法は、Anthos(GKE Enterprise):クイックスタート ステップ4:リソースグループ作成を確認してください。作成したリソースグループに対してCloud Service Meshを有効にし、Cloud Service Meshバージョンを指定して、クラスターを初期設定します。

設定完了までしばらく待ちます。
ステップ2:Namespaceの作成
管理ワークステーションにSSHログインします。
アプリケーション用Namespaceのyaml作成します。
下記のような
namespace.yamlを作成します。apiVersion: v1 kind: Namespace metadata: name: sampleNamespaceのyamlを適用します。
作成した
namespace.yamlをクラスターに適用します。$ kubectl apply -f namespace.yaml
ステップ3:自動サイドカーインジェクションの有効化
自動サイドカーインジェクションを有効にします。詳細は、Google Cloud: 自動サイドカー インジェクションを有効にする を参考にしてください。
クラスターで利用中のCloud Service Meshバージョンに対応する
istiodのリビジョンラベルを出力します。$ kubectl get deploy -n istio-system -l app=istiod -o \ jsonpath={.items[*].metadata.labels.'istio\.io\/rev'}'{"\n"}'アプリケーションの名前空間にリビジョンラベルを適用します。REVISION には前の手順で出力した
istiodのリビジョンラベルの値を指定します。$ kubectl label namespace sample istio.io/rev=<REVISION> --overwrite
ステップ4:Deploymentの作成
アプリケーション用Deploymentのyaml作成します。
下記のような
deployment.yamlを作成します。下記の例は「Hello Kubernetes!」を返却するシンプルなアプリケーションです。apiVersion: apps/v1 kind: Deployment metadata: name: hello namespace: sample spec: selector: matchLabels: run: hello replicas: 3 template: metadata: labels: run: hello spec: containers: - name: hello image: gcr.io/google-samples/node-hello:1.0 ports: - containerPort: 8080Deploymentのyamlを適用します。
作成した
deployment.yamlをクラスターに適用します。$ kubectl apply -f deployment.yamlPodの動作を確認します。
適用したアプリケーションのPodのSTATUSが、「Running」になることを確認します。
$ kubectl get pod -n sample
NAME                     READY   STATUS    RESTARTS   AGE
hello-5c74f54cf7-4769h   2/2     Running   0          14s
hello-5c74f54cf7-fjhzz   2/2     Running   0          14s
hello-5c74f54cf7-n2xsd   2/2     Running   0          14s
ステップ5:Serviceの作成
type: ClusterIP のServiceのyamlを作成します。
アプリケーションへのアクセスを管理するために、下記のような
service.yamlを作成します。apiVersion: v1 kind: Service metadata: name: hello namespace: sample spec: type: ClusterIP selector: run: hello ports: - name: http port: 80 targetPort: 8080Serviceのyamlを適用します。
作成した
service.yamlを適用します。$ kubectl apply -f service.yamlServiceを確認します。
作成したServiceの情報が確認できます。
$ kubectl get service -n sample
NAME    TYPE        CLUSTER-IP       EXTERNAL-IP   PORT(S)   AGE
hello   ClusterIP   172.16.130.202   <none>        80/TCP    20s
ステップ6:Serviceにアクセス
アプリケーションの動作を確認します。
$ kubectl run curl --image=curlimages/curl -it --rm -- sh
$ curl hello.sample.svc
Hello Kubernetes!
フィードバック
サービス利用中のトラブルは、サポート窓口にお願いします。
お役に立ちましたか?
